Installing Release 10.0 on the server
Installation overview
In a multiuser local area network environment, Microsoft Dynamics GP applications are typically installed on a server, and then on each client. When you install Microsoft Dynamics GP on the server, both server and client components are installed on the server. Each client will have access to data stored on the server. You must install your company database on the server first. Then, from any client, you’ll install client components using the Microsoft Dynamics GP CD or using a client installation package.
Installing Microsoft Dynamics GP (server and first client)
Before beginning the installation, be sure you’ve completed the installation preparation steps listed in Part 1, Preparation, and that no other applications are running.
To install Microsoft Dynamics GP (server and first client):
1. Be sure that you’re logged in to Windows as a user with system administrator privileges.
2. Insert Release 10.0 CD 1 in the CD-ROM drive of your server computer. The main Microsoft Dynamics GP installation window should appear. If the window does not appear automatically, browse the CD and double-click the Setup.exe file.
3. Click Microsoft Dynamics GP.
The installation program verifies that your system has the minimum operating system required to run Microsoft Dynamics GP. If your system does not meet requirements, the installation will not continue.
4. If you are installing Microsoft Dynamics GP on a computer with an existing instance of Microsoft Dynamics GP Release 10.0, select the Create new instance option, enter a name for the new instance, and then click Next.
5. In the Country/Region Selection window, select the primary country or region where you do business. Your selection affects which features are available to install. Some features are available only in selected countries or regions. Click Next.
6. Follow the instructions in the window to accept the software license agreement.
To install Microsoft Dynamics GP, you must accept this agreement and click Next.
7. In the Select Features window, select the features to install.
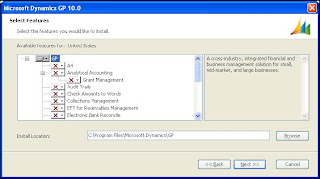
When you click a button for a feature, a pop-up menu of options appears. Refer to the table for more information about each option.
8. Specify the folder where you want the Microsoft Dynamics GP files installed. The default folder is C:\Program Files\Microsoft Dynamics\GP. To select a different folder, click Browse.
After you have specified the installation folder, click Next.
9. To set up an ODBC data source, enter the name you assigned to the SQL Server when you installed Microsoft SQL Server. A data source name called Dynamics GP also is created using SQL Native Client. If you don’t want to set up an ODBC data source, mark the Do not create a data source option. Click Next.
10. In the Install Program window, click Install.
11. The Installation Progress window appears, where you can view the status of the installation.
12. In the Installation Complete window, click Exit.
13. Before you start Microsoft Dynamics GP Utilities, check for and install current Microsoft Dynamics GP service pack for Release 10.0. See CustomerSource (https://mbs.microsoft.com/customersource) for the latest service pack information.
